When a molded plastic part cracks in the field, the fastest way to reduce scrap, warranty risk, and repeat failures is to stop asking only “what broke” and start asking “why did it break here, now, and in this way?” In plastic part cracking analysis, the root cause usually falls into one of three buckets: material toughness limits, stress concentration or overload, and environmental attack that turns a normally acceptable design into a crack-prone one. The challenge is that these causes often overlap, so a good diagnosis needs to follow the fracture evidence, the service history, and the processing record in a disciplined order.
If your project needs a faster path from failure symptoms to corrective action, our custom plastic compounding support can help you compare resin families, tune impact or heat resistance, and reduce crack risk without overcorrecting the formulation. At Poly Maro, we usually start by matching the part’s stress profile, environment, and processing window before recommending reinforcement, impact modification, or a more stable base resin, because the wrong fix can trade cracking for warpage, brittleness, or cost overruns.
Why plastic parts crack: the three most common root-cause buckets
Most cracked plastic parts can be traced to one or more of these categories:
- Material toughness risk: the resin does not have enough impact strength, elongation, or crack-growth resistance for the part’s load, geometry, or temperature range.
- Stress-related risk: residual molding stress, assembly preload, vibration, or geometric stress concentration pushes a part past its local limit.
- Environmental risk: chemicals, UV, heat, humidity, or thermal cycling reduce strength or trigger stress cracking plastic behavior over time.
The practical goal is not to pick the most dramatic explanation. It is to identify which factor initiated the crack, which factor propagated it, and which factor made the problem visible in the first place. That distinction matters because the corrective action changes completely depending on whether the root issue is a brittle material choice, a design notch, a molding defect, or a service environment that the resin cannot tolerate.
Start with the fracture pattern, not the assumption
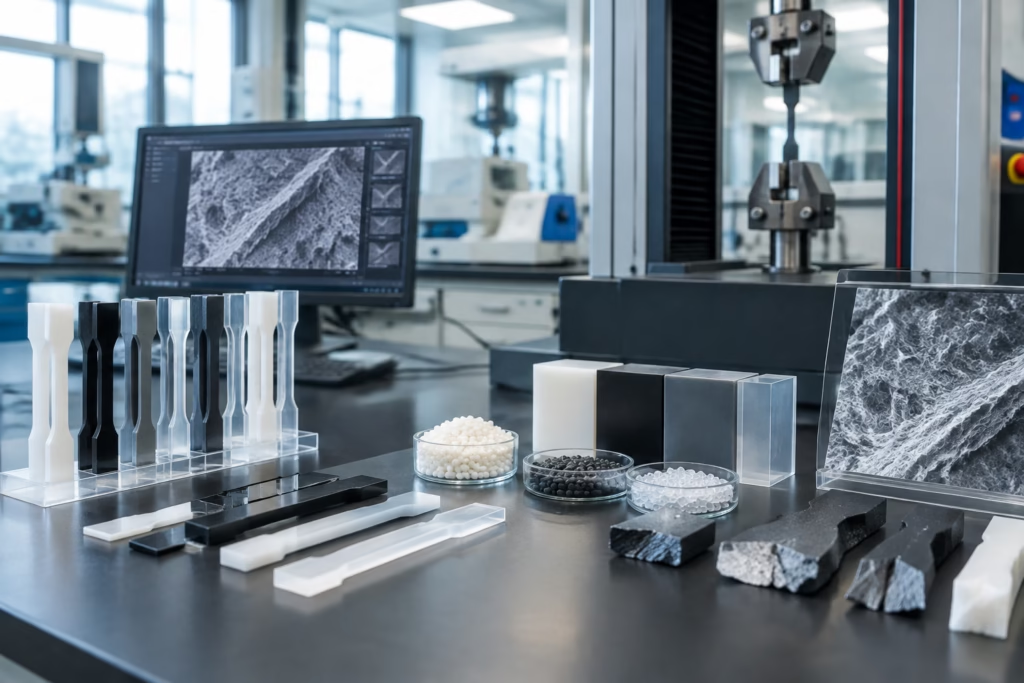
Before reviewing the datasheet or changing materials, inspect the crack itself. The fracture surface, crack path, whitening, and break location often give stronger clues than a general complaint that the part “just cracked.”
| Failure sign | What it often suggests | Diagnostic implication |
|---|---|---|
| Clean, sudden break with little deformation | Brittle fracture or low toughness | Check resin choice, drying, aging, and temperature exposure |
| White stress marks or crazing before break | High local stress or environmental stress cracking | Review geometry, assembly load, and chemical exposure |
| Crack starts near a screw boss, rib, weld line, or corner | Stress concentration | Examine design and molding conditions |
| Crack appears after service time, vibration, or repeated load | Fatigue or creep-assisted cracking | Check load cycles, temperature, and long-term stress |
A careful visual read is especially useful when the part failed far away from the first suspected contact point. Crack propagation usually tells a story: where the stress began, how the material resisted it, and whether the environment made the crack advance more quickly.
Step 1: Identify the crack type first

Not all cracks mean the same thing. In plastic part cracking analysis, the first step is to classify the failure mode.
Brittle fracture
Brittle fracture usually looks sudden and sharp, with limited necking or whitening. It often appears when the part is too stiff and not tough enough for the actual service conditions. A filled resin, an over-dried polyamide, an aged PC blend, or a material substitution that improved cost but reduced impact margin can all create this pattern. If the part breaks cleanly at normal use loads, material toughness must stay high on the suspect list.
Stress cracking
Stress cracking occurs when stress and a susceptible environment work together. The part may not have been overloaded in a simple mechanical sense, but local tensile stress plus oils, cleaners, fuels, or other media can trigger crazing and delayed fracture. The crack often begins at a notch, weld line, or sharp transition and grows even though the part looked acceptable during assembly. This is why stress cracking can be misdiagnosed as “bad material” when the real issue is the combination of stress and chemistry.
Fatigue cracking
Fatigue cracks grow under repeated loads such as vibration, flexing, or cyclic impact. These failures are common in clips, housings, mounts, hinges, and structural connectors. The part may survive initial use but gradually accumulate damage until the crack becomes visible. The key clue is service history: if the crack appeared after many cycles rather than a single event, the design or material may be underestimating long-term load repetition.
Impact breakage
Impact-related cracking usually involves a sudden overload event, but the actual severity needed to fail the part depends on impact toughness, temperature, and part geometry. A cold part can fail more easily than the same part at room temperature. A rigid resin that works in one product may fail in another if the drop height, installation tool, or fit condition changes. For impact-sensitive applications, we often compare standard grades against impact-modified plastic compound solutions to see whether the failure margin is truly insufficient or whether another factor is amplifying the break risk.
Environmental attack
Environmental attack can be slow and invisible at first. UV exposure, heat aging, humidity, and chemical contact may reduce elongation or create surface embrittlement before the first crack appears. This is common in outdoor housings, appliance components near cleaners or steam, automotive parts near oils, and electronic enclosures exposed to temperature swings. If the part cracked after a long service period rather than immediately after molding or assembly, the environment must be included in the root-cause review.
What crack appearance tells you
Appearance is not proof by itself, but it is a strong screening tool. The fracture face and surrounding surface can help separate a material problem from a stress problem.
- Whitening near the crack: often indicates local yielding, overload, or concentrated stress.
- Crazing or fine surface spidering: can point to environmental stress cracking or a resin that is being attacked while under tension.
- Crack origin at a sharp corner: suggests notch sensitivity or poor geometry.
- Crack origin at a weld line: suggests a weak knit area, insufficient weld strength, or poor packing and venting.
- Multiple small cracks: can indicate fatigue, thermal cycling, or repeated assembly loading.
Failure location matters as much as the fracture texture. A crack at a screw boss may signal overtightening or local hoop stress. A crack along a thin-to-thick transition may signal molding stress and poor transition design. A crack that starts at a chemically exposed edge but not elsewhere often points to environmental stress cracking rather than a global material defect.
Step 2: Check material toughness and formulation risk
If the part is cracking without a clear overload event, start by checking whether the resin has enough toughness for the application. Material toughness is not just impact strength in a datasheet table. It is the combination of impact resistance, elongation, crack-growth resistance, and how those properties hold up after processing, aging, and conditioning.
Low impact strength and low elongation
A resin with low impact strength may crack instead of deforming. That is especially dangerous in structural parts, clip features, and parts that see tool contact during installation. Low elongation can also make a part more notch-sensitive, so a minor stress concentration becomes a visible crack. When a design is near its limit, the gap between “works in the lab” and “fails in production” can be very small.
Excessive filler loading
Glass fiber, mineral filler, or other reinforcing packages can improve stiffness and heat resistance, but they may also reduce impact toughness or increase anisotropy if the formulation is not balanced carefully. A heavily filled material may crack at thin sections, corners, or weld lines even though its nominal strength looks good on paper. That is why material selection must be tied to part geometry and load direction, not only to a single tensile number.
For parts that need higher stiffness without sacrificing all durability, our glass fiber reinforced resin solutions are often evaluated alongside unfilled or impact-modified alternatives so the team can see whether the target is truly structural stiffness, or whether the part simply needs better crack resistance with moderate reinforcement.
Aging, moisture loss, and improper substitution
Aging changes toughness. Heat, UV, and repeated stress can reduce ductility over time. Moisture loss can also matter, especially for hygroscopic resins, because the part may be molded or stored in a condition that does not reflect its real-life service state. Improper material substitution is another common risk: a close-looking grade may share a resin family but not the same toughness, moisture behavior, or crack resistance. From a procurement perspective, the highest-risk substitutions are those made for price or availability without a full comparison of impact, heat, and environmental behavior.
Step 3: Check stress sources in the part and process
Even a strong resin can crack if the part carries too much stress. Stress may come from molding, assembly, design, or service. The key is to identify whether the part was already stressed before it entered the application.
Residual molding stress
Residual stress forms when the part cools unevenly, packs unevenly, or freezes in a strained state. Thin sections, imbalanced gate positions, aggressive packing pressure, or poor mold temperature control can all leave stress trapped in the part. A crack that appears near the gate, weld line, or thick-to-thin transition may be less about the resin grade and more about the way the part was molded.
Assembly stress
Over-tightened screws, interference fits, snap-fit overstrain, and distorted assembly fixtures often create local tensile load that only becomes visible later. Parts can leave the line looking acceptable and fail after vibration, thermal cycling, or a short service period because the assembly load was already too high. This is one reason we ask for installation sequence, torque practice, and fixture details during investigation instead of focusing only on the resin specification.
Geometry-driven stress concentration
Sharp corners, abrupt wall changes, small radii, thin ribs, and poorly placed bosses all concentrate stress. Even when the average load is modest, a notched area can exceed the material’s local strain tolerance. If the crack always starts in the same geometric feature, the design itself may be the main root cause. In those cases, a material upgrade alone may hide the issue temporarily but not solve it.
Molding process effects
Drying, melt temperature, mold temperature, packing pressure, and cooling balance all affect crack sensitivity. Under-drying can lower mechanical performance in moisture-sensitive resins. Overheating can degrade polymer chains. Under-packing can leave voids or weak sections, while over-packing can lock in stress. The process should be reviewed as a system, because a part that cracks after molding may not be “bad resin” at all; it may simply be a part molded outside its stable window.
When stress and heat are both part of the service condition, we often review heat-resistant plastic compound options to see whether the application needs better thermal retention, improved creep resistance, or a formulation that holds its mechanical properties longer at elevated temperature.
Step 4: Check environmental factors
Environmental factors often determine whether a borderline part survives or cracks. This is especially true when the part is already carrying stress from design or assembly. In practice, the environment is rarely the only cause, but it is frequently the trigger that turns an acceptable design into a failed one.
Chemicals, oils, and cleaners
Many plastic cracks are actually stress-assisted chemical failures. Oils, lubricants, cleaners, fuels, and industrial media can interact with the polymer surface or internal stress state and accelerate cracking. A part that survives dry bench testing can crack quickly in the presence of a cleaning agent or process fluid. If the service environment includes repeated wipe-downs, immersion, splash, or vapor exposure, chemical compatibility must be part of the failure review.
Heat, UV, humidity, and thermal cycling
Heat accelerates aging. UV can embrittle exposed surfaces. Humidity can change dimensions, stiffness, or moisture content depending on resin family. Thermal cycling expands and contracts the part repeatedly, which can worsen residual stress, loosen joints, or initiate cracks at weak points. Outdoor parts, automotive trim, appliance housings, and electrical enclosures often need both mechanical and environmental margin, not just one or the other.
In some applications, flame performance is also part of the qualification picture. If the part sits near electrical load, heat, or ignition risk, the cracking investigation should still consider whether the chosen grade had the right safety balance. In those cases, we may compare against flame-retardant plastic material pathways while checking whether the added FR package changes toughness, creep, or crack sensitivity.
How to distinguish material weakness from environmental stress cracking
A useful rule is this: if the same part cracks only after exposure to a certain chemical or condition, while the same geometry survives in a neutral environment, the environment is likely a major contributor. If the part cracks under simple load without any special exposure, material toughness or design stress should be examined first. If both are present, the environment may be the accelerant rather than the original initiator.
Design-related causes: geometry, rib layout, gate position, and notch sensitivity
Design is often blamed too early, but it is also one of the most common hidden causes. A part can have a reasonable resin choice and still crack because the geometry creates a stress amplifier.
- Thin-wall transitions: create abrupt stiffness changes and uneven cooling.
- Sharp internal corners: raise local stress and promote crack initiation.
- Poor rib-to-wall ratios: can create sink, stress, or warpage that later turns into cracking.
- Gate position: can influence weld line location and fiber orientation.
- Boss design: can overload a screw interface or generate hoop stress.
Notch sensitivity is especially important in engineering plastics. A grade with good nominal strength may still fail early if the part includes a sharp notch, a weld line, or a feature that forces stress into a very small region. If the crack always repeats at the same feature, design review should happen before a material change is approved.
Dimensional stability also matters because warped parts create built-in assembly stress. For parts that are tight in fit, this can be just as damaging as overtightening. If you want a structured way to think through the geometry side of failure, our article on how to evaluate dimensional stability in plastics is a useful companion when warpage and crack initiation seem connected.
Application-related causes: vibration, load cycles, impact, installation, and service temperature
The same part can perform well in one product and fail in another because the actual use case is different. This is why cracking analysis must include service conditions, not just the part drawing.
Vibration and load cycling
Automotive, appliance, and equipment parts often see repeated low-amplitude loads that slowly grow a crack. This is classic fatigue behavior. The initial stress may be small, but repeated flexing at a weak point eventually fails the part. If the crack is narrow and progressive rather than sudden and broad, fatigue should be considered.
Impact and installation method
Installation can create impact loads that are absent from normal use. A clip that survives in the field may crack during assembly if the installer uses the wrong angle, force, or tool. This is especially important for snap-fits, connectors, and precision housings. Material toughness, geometry, and process all need to align with the real installation method, not the idealized one.
Service temperature
A part that is safe at room temperature can become brittle or creep-prone at elevated temperature, or it can lose impact resistance at low temperature. Temperature affects both the resin and the stress state. That is why service temperature must be considered together with the load profile. A part that is only slightly overloaded may still crack if it is already weakened by heat aging or thermal cycling.
A practical failure-analysis sequence
When the goal is fast root-cause isolation, we recommend a sequence that moves from visible evidence to technical evidence.
- Document the failure: record photos of the crack, surrounding deformation, assembly condition, and location in the product.
- Identify the crack mode: brittle, stress cracking, fatigue, impact, or environmental attack.
- Check service history: note load, temperature, chemicals, installation method, vibration, and time to failure.
- Review the material record: confirm exact grade, lot, any substitutions, drying condition, and molding history.
- Compare the part to the datasheet: look at impact strength, elongation, HDT, shrinkage, and moisture sensitivity.
- Review design and process: inspect corners, ribs, weld lines, gate location, packing, and cooling balance.
- Test or replicate: if possible, reproduce the failure with controlled load or exposure to confirm the trigger.
This sequence prevents the most common mistake in crack diagnosis: replacing a resin before understanding whether the crack was caused by stress, environment, or design. In our own compound-development work at Poly Maro, we find that the fastest solution is usually the one that matches the failure mechanism instead of the loudest symptom.
What evidence to collect before you change the resin
Good evidence saves time and avoids costly trial-and-error. Before changing material, collect the following:
- high-resolution fracture photos from multiple angles
- part location and orientation in the assembled product
- service temperature and exposure history
- chemical contact information, including cleaners or lubricants
- material lot number and supplier traceability
- molding parameters, drying records, and cycle conditions
- impact, tensile, or dimensional records if available
- comparison parts from the same lot that did not fail
Material lot data and process records are especially important because they help separate a systemic material issue from a one-off molding or handling error. If the same crack appears across several lots, the investigation points more toward design or application stress. If it appears only in one lot or after a specific processing change, the root cause may be upstream in material handling or molding practice.
For parts where moisture uptake affects cracking risk or dimensional change, especially in polyamides and precision components, it is also worth reviewing how to judge low moisture absorption plastics for precision parts so you can decide whether the part needs a drier resin family or tighter conditioning control.
Corrective actions by root cause
Once the cause bucket is clearer, the corrective action becomes much more targeted.
If the main issue is material toughness
Upgrade to a tougher grade, choose impact modification, or reduce excessive filler loading if stiffness is not the only priority. In some cases, a switch to a more balanced resin family is better than forcing a brittle grade to do a tough part’s job. This is where sample validation should include real load, real temperature, and real exposure rather than only a room-temperature bend check.
If the main issue is stress
Reduce sharp corners, improve radii, redistribute ribs, change gate location, reduce assembly preload, and review screw torque or fit condition. On the process side, optimize drying, packing, mold temperature, and cooling to lower residual stress. Stress reduction can deliver a bigger gain than material change if the resin itself is already adequate.
If the main issue is environment
Improve chemical resistance, add UV stabilization, isolate the part from cleaners or solvents, or revise the enclosure and sealing strategy. If heat is the driver, a higher-temperature resin may be needed. If moisture or humidity is the issue, select a grade with better dimensional stability or lower moisture sensitivity. If the environment is aggressive and the part is also stressed, the formulation may need to shift significantly rather than incrementally.
If the problem is multi-factor
Multi-factor failures are common. A part may be slightly under-designed, slightly over-stressed, and slightly underqualified for its environment. In those cases, a single correction may not be enough. A practical solution may combine a more robust material, moderate reinforcement, improved gate balance, and tighter assembly control. When the part needs both stiffness and dimensional control, the design team may also consider heat-resistant plastic compound options or other modified grades depending on the failure mode.
When to switch to a tougher or more chemical-resistant modified plastic
A material switch is justified when the current grade cannot meet the required balance of toughness, environmental resistance, and processability even after reasonable design and process correction. Signs that a switch may be appropriate include repeated cracking across lots, service conditions that exceed the resin’s normal comfort zone, or a history of cracks appearing after chemical exposure or heat aging.
At that point, the selection question becomes less “which resin is strongest” and more “which modified plastic provides enough margin without creating new risks.” For example, a tougher grade may help impact failures, while a chemically resistant option may be better for cleaner, oil, or solvent exposure. If structural stiffness is part of the requirement, the team may need to test both unfilled and reinforced candidates before locking the specification. That is why material development should be tied to part function, not only to the resin family name.
Supplier communication checklist for cracking investigations
When you involve a resin or compound supplier, give them the failure data they need to help you efficiently. Ask:
- Was the exact grade used, including any batch or formulation change?
- What drying conditions are recommended, and were they followed?
- How does the material behave under impact, heat, and chemical exposure?
- Are there known risks with weld lines, thin walls, or high assembly stress?
- Would a tougher, heat-resistant, or reinforced grade better fit the part’s use case?
- Can the supplier support sample validation with process and property guidance?
From a manufacturing perspective, supplier communication should also cover MOQ, lead time, color consistency, and batch consistency if the part is in production. A technically suitable grade can still become a sourcing problem if the supply plan cannot support the needed schedule or repeatability. That is why the materials conversation should include both performance and production planning.
When you need a broader sourcing comparison between a tailor-made solution and an off-the-shelf option, our discussion of custom plastic compound vs standard grade can help frame the trade-off between upfront development and long-term crack risk reduction.
Common mistakes in crack analysis
Several missteps repeatedly slow down root-cause analysis:
- Blaming the resin too early: a poor design or assembly condition may be the real trigger.
- Ignoring service exposure: a part that works dry may fail in oils, cleaners, or heat.
- Using only one test: one impact or tensile result rarely explains a complex failure.
- Skipping lot traceability: material consistency matters when cracks repeat.
- Changing three variables at once: this makes it impossible to know what fixed the issue.
- Overlooking mold conditions: residual stress can look like bad material.
Avoiding these mistakes makes the investigation faster and more credible. It also prevents the common cycle of replacing one grade with another that only masks the symptoms.
A quick decision tree for the first suspect

If you need a simple starting point, use this logic:
- Crack happened immediately during assembly or first load: start with stress, geometry, and impact toughness.
- Crack appeared after repeated use or vibration: check fatigue, load cycles, and design concentration points.
- Crack appeared after chemical or outdoor exposure: start with environmental stress cracking and aging.
- Crack appears at weld lines, corners, or screw bosses: inspect design and molding stress first.
- Crack is clean and brittle across multiple parts: review material toughness, drying, and possible substitution.
This is not a substitute for full analysis, but it helps teams avoid the most expensive wrong turn: changing the resin before the failure mechanism is understood.
Conclusion
Effective plastic part cracking analysis is not about guessing the strongest suspect. It is about following the evidence in a logical order: crack type, crack location, material toughness, stress sources, and environmental exposure. In many cases, the real root cause is a combination of design, process, and service conditions rather than a single bad part number. If you approach the problem this way, you can choose a fix that is realistic, repeatable, and aligned with production needs instead of simply treating the symptom.
At Poly Maro, we support this kind of investigation by helping teams compare resin families, reinforcement choices, and modification paths against the actual failure mode. The best outcome is not just a non-cracking part; it is a stable material and process window that keeps the part performing across production and service.
FAQs
How do I know if a crack is caused by material brittleness or stress?
Look at where the crack started and how it looks. A clean sudden break with little deformation often points to brittleness, while a crack that starts at a corner, screw boss, weld line, or tight fit often points to stress concentration. If the part failed after repeated load, vibration, or assembly preload, stress is usually involved even if the resin also has limited toughness.
What is the difference between stress cracking and regular cracking?
Regular cracking can happen from overload, poor toughness, or fatigue alone. Stress cracking usually needs both stress and an environmental trigger such as oil, cleaner, solvent, or heat. The part may look acceptable at first, then crack later because the environment reduced the material’s resistance while stress was still present.
Should I replace the resin before checking the part design?
Not usually. If the crack starts at a sharp corner, thin transition, rib junction, or weld line, the design may be the bigger problem. Changing the resin first can hide the issue temporarily without removing the stress source. It is better to check geometry, assembly load, and molding conditions before approving a material change.
Can drying errors cause plastic parts to crack?
Yes. Drying errors can reduce toughness, increase hydrolysis risk in sensitive resins, or leave the part in a condition that does not match its intended performance. If a hygroscopic resin is processed incorrectly, the finished part may be weaker, more brittle, or less stable than expected.
When should I consider a modified plastic instead of the standard grade?
Consider a modified plastic when the standard grade does not provide enough impact resistance, heat resistance, chemical resistance, or dimensional stability for the actual service environment. This is especially important when the part is stressed, exposed to chemicals, or installed in a tight geometry where crack margin is limited.
What should I send to a supplier during a cracking investigation?
Send fracture photos, part drawings, service conditions, material lot data, drying records, molding parameters, and any chemical exposure details. If possible, include comparison parts that did not fail. The more complete the evidence, the easier it is for the supplier to assess whether the issue is material, process, design, or environment related.